When you first start playing guitar chords things can sound a little funny. Often you can make a couple strings sounds properly and the others produce indiscernible noise. Don't be discouraged by this. It is the basic point that everyone starts at. Through a few simple corrections to the position of your fretting hand we will be able to solve a lot of your problems. Getting a full chord sound depends on how you shape your hand, where you place your fingers, and how hard you press on the strings.
- Hold the String Down Near the Fret - This applies to playing chords and single notes alike. For example, when someone tells you to put your finger on the third fret, what they are really saying is to put your finger in between the second and third fret. Never place your finger directly on the fret. In this example, the ideal finger placement is between the second and third fret, shading about three fourths of the way towards the third fret.
- Keep Your Fingers Squared - One of the biggest killers to making your strings sound the way you want them to sound is allowing your fingers to fall flat on the guitar. Flat fingers are the enemy of sound for your guitar. Your fingers have two distinct breaking points at the knuckles and you must use these breaking points to create space. When we say keep your fingers squared, we mean to keep the breaks in your knuckles sharp and noticeable. You should notice that your fingers are broken into three very distinct sections creating a square shape (the bottom of the square is completed by the guitar fingerboard itself). There will be times with certain chords where the same finger needs to be on two different strings at once (chord D, for example). Obviously this will require slightly less squaring of your fingers to accomplish but squared fingers is a good general rule to start yourself with.
- Proper Pressure - Proper pressure on the strings requires an even distribution of pressure to each string used in your chord. The amount of pressure is largely based on feel. You do not need to press down hard on the strings to make a note sound. Pressing down too firmly will create all sorts of unwanted and unnecessary tension in your hands and, more importantly, your fingertips. Pressing down too lightly can also create difficulties. Once you have checked your hand position, vary the pressure on the strings applied through your fingertips until you find a happy middle ground. But remember, the most important thing is to apply an equal amount of pressure to each string.
Guitar Hand Shapes
The way you shape your hand on the guitar is the key to learning basic guitar chords. Once you learn a single hand shape you will have learned 12 different chords through some minor variations. Pictured below are many basic hand positions below along with their corresponding keys.
Barre Chords
As previously discussed, each hand position can effectively be 12 different chords. This accomplished through the use of barre chords (or bar chords). You can use bar chords to your advantage because they trick the ear into thinking it is hearing a new sound by changing the tonal range. Embellishments can be added by playing the same chords in different positions on the guitar. The audience will think something totally different is happening but for the guitar player, all that is required is sliding your hand up and down the guitar while maintaining the same hand shape.
A single finger barre chord (pictured below) will require you to use place your index finger across several strings at once, forming a bar. Think of the index finger in this example as the "new top" of your guitar, taking the place of the string nut at the end of the fret. The top of the guitar is no longer relevant and wherever your index finger lays is the new top. By sliding your hand up and down the guitar, you will be effectively changing the top and thereby altering the sound the audience hears.
Specific Barre Chords in Action
The following bar chords will get you started on the road to playing the guitar properly.
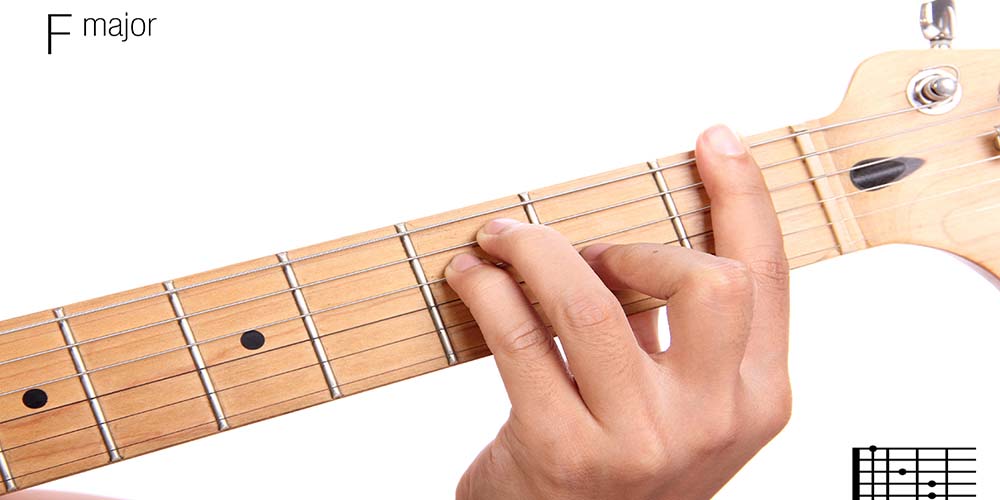
F Bar Chord - If you look the E Major shape and compare it to the F bar chord shape, you will see that the F bar chord is simply the E chord moved up one fret, with the index finger then put across the strings to take the place of the string nut.
Normally you would play the E chord using your index, middle, and ring fingers. But if you alter this slightly and instead use the middle finger, ring finger and pinky instead, you will find that when you slide the shape up one fret, the index finger is in perfect position to take the place of the string nut and play the F Major chord. Move it up one more fret and you have the chord of F Sharp Major, up another fret and you will be playing the chord of G major.
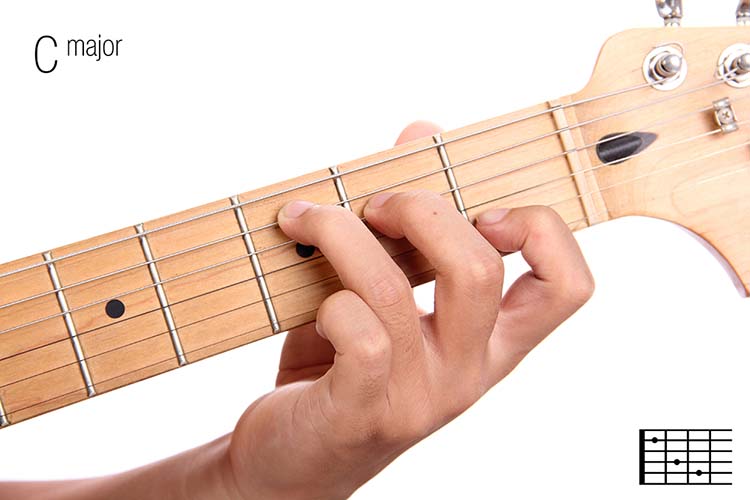
C Major bar chord This bar chord can be moved along the frets in the same way. By flattening your fingers from the F Major shape into the C Major shape and staying at the 1st fret, the chord of B flat Major) can be formed. This may be difficult for you to do at first but don't get discouraged. Try to keep your wrist and hand as relaxed as possible and only apply just enough pressure to sound the notes. Try the shapes further along the fret board. You may find the lower positions a bit more difficult at first but with a bit stick with it and you'll soon get the hang of it. if the lower positions are causing you trouble, with a little perseverance you'll soon get the hang of it.